Saturday 28 April 2012

From the Mrs: Chunky Monkey Muffins

Mary Berry meet Ben and Jerry! These muffins are inspired by Mary Berry's chocolate banana bread and Ben and Jerry's chunky monkey ice cream...my two favourite things! I've messed around with the recipe a bit to create my own version and these muffins always go down well with my family and friends. They are fun, easy and very quick to make and just the most delicious muffins ever.

Ingredients

  • 250g self raising flour
  • A pinch of salt
  • 150g caster sugar
  • 100g butter (melted and cooled slightly)
  • 2 medium eggs, beaten
  • 2 large ripe bananas - mashed with some lumps left in
  • 75g dark cooking chocolate - chopped into chunks
  • 100g walnut pieces
  • 1 tablespoon of sugar or caster sugar
  • 1 teaspoon of cinnamon
Muffin tray and muffin cases

How to make

Preheat the oven to gas mark 4/180ŸC

Melt the butter in the pan on a medium heat and leave to cool. Whilst the butter is cooling weigh all of your ingredients and mash the bananas, chop the chocolate and beat the eggs.

Put the flour, salt and sugar into a bowl and mix together. Add the melted butter and the beaten eggs and then the mashed banana.

Cover the walnuts and chocolate in a bit of flour (not sure if this works but it usually stops the chocolate and walnuts sinking to the bottom) then add these to the mixture.

Mix thoroughly with a wooden spoon until all of the ingredients are combined.

Spoon into the muffin cases - almost to the top of each case and place in the oven for about 20 minutes or until a cocktail stick inserted into the middle of the muffin comes out clean and the muffins are golden brown.

Leave to cool for 5 minutes then transfer to a wire rack.


Next prepare your sugar and cinnamon mixture - mix the sugar and cinnamon together. Once the muffins have cooled slightly, brush the top of the muffins with a little milk and then sprinkle the mixture over the top of each muffin.

Spinach and Feta Filo Pie

Going heavy on vegetables and other stuff known to be good to you doesn't have to result in boring dinners. Check this amazing pie for proof: if, unlike me, you don't like spinach (which used to be my nightmare food number 1 thanks to some slimy, overcooked early encounters), this is a great way to hide this excellent - and tasty - source of vitamins and iron amongst other, stronger flavours. This recipe is a combination of two sets of instructions for what is basically the same pie: one from Jamie Oliver, the other from Essentials magazine (I may well be this publication's sole male reader, although my interest in its contents crashes to a halt once the often imaginative food section ends). It's ideal for shared cooking duties and a bit of kitchen-based quality time: anything to do with baking frightens me (all that precision!) so I'll quite happily delegate the pastry duties to my wife, whose baking expertise makes her an ideal candidate for the undeniable fiddly task of getting the Filo pastry to co-operate. This despite my more than slight tendency to be a terrifying control freak/tyrant in the kitchen. I'll be honest with you: handling all this prep on your own is a bit of a hassle, so it's best to share the fun - and the results!

Ingredients
  • 150 - 300g of spinach (the more the better)
  • 1 pack of Filo pastry
  • 1 pack (200g) of Feta cheese
  • 2 eggs
  • Generous amount of fresh dill and parsley
  • 1 tablespoon of cumin seeds
  • The grated zest of 1 lemon
  • A few marinated peppers (from a jar - sold in the Pickles section of supermarkets), roughly chopped
  • Sprinkling of salt and black pepper
How to make

Heat your oven to gas mark 4/150C. Get a large bowl, crumble in the Feta cheese, break in the eggs, add the cumin seeds, lemon zest, fresh herbs, salt and pepper. Wash your spinach and add to a moderately heated frying pan - ideally, add a drop of oil or a knob of butter on the pan before adding the spinach for extra flavour. Move around the pan until the spinach wilts - it's ready when it's shrunk in size and turned into a dark green colour. Be careful not to wilt it too much or you may end up with next to no spinach at all! Drain the wilted spinach carefully in a colander, making sure to squeeze out any excess water. Add to the bowl with all other ingredients apart from the peppers. Mix thoroughly with a wooden spoon.

Now for the tricky bit...

Take a rectangular shaped sheet of greaseproof paper, brush it with olive oil and scrunch it up in a ball and then spread it out flat again.
Take your filo sheets. If they are long rectangular sheets cut them in half so you have squares. Then take one square (carefully so the pastry doesn't tear) and place it in the top left corner of your greaseproof paper, then take another square and put it in the top right...overlapping a bit with the left. Then take two more squares and place them underneath each square at the top. Brush with olive oil and repeat until you have used all of your filo pastry. See diagram right.

Once the pastry is ready, lift the greaseproof paper on to a deep frying pan. Make sure it's in the middle of the pan. Press the sheet down so that it fits snugly in the frying pan. Spoon in the pie mix, and top with the chopped marinated peppers. Fold the excess pastry hanging over the edges of the pan inwards to close the pie and to cover the mixture, trim off the excess greaseproof paper and place in the oven for 30-35 minutes. Check that the egg is cooked through before serving.

Serve with a salad of cucumber, olives, mint and finely chopped fresh chilli, with a simple lemon juice and olive oil dressing. Bask in the warm glow of having just eaten one of your five a day.


Eat Your Greens


That thing about us being what we eat? There's more than a grain of truth to it. Let me illustrate. Before I got over my fear of fresh ingredients, we lived on what can only be described as borderline poisonous stuff. Fat- and salt-loaded convenience foods were the norm. What all these frozen, breaded, salt-encrusted and sugar-coated goods had in common was that they were all predominantly grey in colour. I was grey, too - not to mention being the less than proud owner of the chubbiest cheeks in my locality. I was in my mid-20's, but looked considerably older, due not least to the generously inflated spare tire I was carrying around my waist. I tried to exercise but it wasn't much use, a situation not improved by my vitamin-deficient diet leaving me feeling sluggish, unwell and often more than a bit blue.


All that changed the day when I first understood and accepted this simple fact: vegetables can - and should - taste good. They're nothing to be scared of. In fact, I'm now convinced that painful childhood memories involving vegetables treated as an afterthought that don't deserve the same care and attention as more costly meaty bits are the reason so many people prefer to heat up something containing mysterious animal parts from a package to, say, steaming a bit of broccoli. I'm sure we all have traumatic memories of school dinners consisting of veggies boiled mercilessly until they become just as unappetisingly grey as, say, those infamous turkey twizzlers, or parents forcing us to munch on spinach that's been subjected to some cruel and unusual punishment involving lengthy, texture-erasing immersion in boiling water. It's never too late to embrace green goods: I used to loathe, say, cabbage with a passion, now it in all its many variants (not sprouts, however: my veggie enthusiasm knows some limits) is a regular and welcome guest at our dinner table. Show them a bit of attention, and vegetables can be just as delicious, filling and satisfying as meat and fish, if not more so.
Crucially, they might just make you feel better. Let's rewind back to that cliché which claims that we are what we eat. I used to be grey and flabby, just like the junk I was shovelling down my throat. Having changed my feeding habits and embraced greenery, I am now...well, not exactly green, but definitely fresher and lighter than I ever have been before. Not that the battle with the belly is my primary reason for introducing vegetables to the menu. By embracing the greens, it's quite OK to eat a whole lot more without experiencing all that many negative side effects, an ideal situation for someone as irredeemably greedy as I am.       


Sunday 22 April 2012

Summer House Vegetable Kebabs

I know what you're thinking: anything barbecue-orientated without meat isn't quite right. But you most definitely don't need to bother any animals to eat well. In fact, with the slightly primitive appliances of the Summer House in mind, it's probably better to avoid things that can spoil easily in the summer heat! These juicy vegetable kebabs, invented in a bit of a panic two summers ago, inspired us to take several steps towards a veg-heavy diet.

Let's rewind back to August 2011. We were at the Summer House and, having been greedy as usual, we were running out of food. Without access to a car, the nearest shop at the centre of Karkkila may as well have been in an entirely different universe. Thankfully, a quick rummage to what little was left in the fridge and the cupboards added to a spot of creativity produced enough green stuff to make up a very tasty dish indeed. It sounds almost too basic to work, but is in fact delicious - the combination of the veg, softened by the intense heat, and the tangy marinade is outstanding...if I may say so myself! This recipe has been amended to work in indoor conditions: if you get a chance to try it outdoors, simply replace the grill function of the oven with a barbecue-type grill heated to medium temperature.
Ingredients
A selection of red, green or yellow peppers, peeled red onions and courgettes, cut into generous chunks and washed (meaty mushrooms would also work well, but having been scared of the huge fungi that grew in our garden when I was very little, I still refuse to go anywhere near a mushroom if it hasn't been hacked into tiny pieces). The amount depends on how many people are eating - and how greedy you are!

Skewers
For the marinade

  • Juice of 1-2 limes (lemons will work, too)
  • A small bunch of fresh coriander and/or mint, finely chopped
  • 1 - 2 fresh chillies, finely chopped
  • 1 clove of garlic, finely chopped
  • A small piece of fresh ginger, peeled and finely chopped
  • A glug of olive oil
  • A generous pinch of salt and black pepper
How to cook

Start by making your marinade by mixing all the ingredients in a bowl that's big enough to house all the vegetable chunks as well. Add the vegetable chunks, mix well together, making sure all the veg is covered by the marinade, and set aside to marinade for as long as you want (a minimum of one hour is recommended) so your flavours can develop.
In the meantime, heat your grill or barbecue to a moderate heat. Once your veg has marinated sufficiently, pierce the pepper, courgette and onion chunks with the skewers to create kebabs, ensuring that each skewers has a bit of every type of vegetable. Place the kebabs under a grill and cook until they are just right, golden (that's golden, not black and charcoal-flavoured!) and slightly softened, turning frequently. The amount of time this takes depends on how powerful your grill is - with an inferno-like appliance like ours, 10 minutes per kebab should be enough.  Unlike meat, it doesn't matter if the kebabs wound up a bit undercooked whilst you're getting the timings right - unless it's crawling with various bugs, you really can't get food-poisoning from greenery. Spoon over the leftover marinade from the bottom of the bowl whilst grilling, and also after the kebabs have been cooked to your satisfaction.

That's it! Serve with sides of your choice - homemade potato wedges or rice with lemon juice, turmeric and fresh coriander will work well. 

Summer House burgers and homemade potato wedges

There's only so much grilled sausage - especially floury, spice-dodging Finnish sausage - anyone can handle, so I've come up with a few easy yet very tasty recipes to add a bit of excitement to summer house meal times. This recipe is amended for indoor conditions - if you get a chance to test it outdoors, simply substitute the griddle pan with a blazing hot grill, the embers glowing bright red. And don't worry about the spices: no one wants to drag along their entire spice rack when heading outdoors. As long as you have garlic, chilli, coriander, lime and (optional) ginger you'll be just fine. At home, I prefer to substitute ginger with the spice mix listed below.
Ingredients (makes four burgers and a generous pile of wedges):
  • 500g turkey or pork mince (lamb works very well, too)
  • 1 onion, very finely chopped
  • 1 egg
  • Juice of half a lime
  • 1 large clove of garlic, very finely chopped or grated
  • 1 - 2 fresh chillies, deseeded, very finely chopped (or leave the seeds in if you prefer your burgers fiery)
  • A small bunch of fresh coriander, finely chopped
  • 1 tsp ground cumin
  • 1 tsp ground coriander
  • 1/2 tsp ground cinnamon
  • 1/2 tsp sumac
  • (optional: grated fresh ginger - to taste)
  • 4 burger buns or other suitable bread
  • 500g potatoes, cut into chunky wedges

How to cook:

Place all your burger ingredients into a roomy bowl. Make sure you have a tray or a plate for resting your burgers on. Rub some oil into your hands to avoid excessive stickiness, place your hands in the middle of the mince and onions mess, and mix everything together thoroughly. The sensation might not be hugely pleasant, but it's good to spend at least a few minutes squeezing and blending everything together to ensure the spices are spread evenly through the burger dough. Once all the ingredients are mixed properly, you should have a ball of burger dough. Divide this dough into four evenly sized portions, and shape into four burgers. Place the burgers on a tray or a plate. Ideally, place the burgers in a fridge for half an hour so to rest so the flavours develop. This step is not essential, however. Wash your hands well, with soap!
Whilst the burgers are resting, cut your potatoes into chunky wedges. Wash thoroughly, and boil for approximately 5 minutes. Drain and leave to rest until the potato chunks have dried a bit. Heat the oven to 200C/gas mark 6. Once the oven has heated, pour a few tablespoons of oil - vegetable oil is my favourite for wedges, but olive or rapeseed oil will work nicely, too - on to a clean roasting tray. Heat the oil in the oven for a few minutes before pouring the potatoes to the tray - this will help them not get stuck to the tray during roasting. Place the potatoes in the oven for 30 minutes, turning occasionally to ensure they are roasted evenly on all sides to create crispy, golden wedges.
Now for the main event. Heat the griddle pan until it's red hot. Pour in a very small amount of oil (we're talking of a trickle here), and turn the pan around to spread the oil evenly on the pan's surface. Place two of the burgers on the pan, and cook on full blast heat for approximately 10 minutes, turning halfway through. Place the burgers on a plate, cover with tray to maintain warmth, and repeat with remaining burgers - you don't want to crowd the pan. Place the cooked burgers on buns - ideally, grill the insides of the buns for a minute or so to create a crusty effect, but be careful not to turn them into charcoal - the pan will be very hot indeed!

Place a pile of potato wedges on plate, and serve the burgers with salad and your choice of sauce. My favourite is a simple combination of natural yoghurt, 2 - 3 tsp of Harissa paste (depending on how spicy you like things) and a dash of lemon or lime juice. If you can't find harissa paste, this can be replaced by a combination of tsp each of paprika and ground caraway seeds, a small pinch of grated garlic and 1/2 tsp of chilli flakes. Hot Finnish mustard is also excellent with these burgers...but maybe not that easy to find here!   


From the Mrs: Finnish Toast

The summer house was a strange place to be for a British girl  when I first started visiting Finland. Getting to grips with a compost toilet, trying to light the sauna and hiding from the elderly next door neighbours as they enjoyed a naked swim was a little overwhelming. But over the years I've embraced the summer house experience and although my Britishness means that I'm still too afraid to leap out from the sauna into the lake wearing nothing but a smile, I feel like I'm doing quite well in all other areas of living at the summer house...I can heat the sauna better than Janne now!

It's a simple life there: we eat, drink, swim, sauna and eat and drink some more. We have basic facilities, which means we have to be quite inventive when it comes to making food. With limited ingredients we've had to get quite creative and that's all part of the fun. This recipe was invented one summer when the blueberry bushes surrounding our summer house were loaded with berries. I spent the afternoon in wellies, dodging the snakes (I only saw one but nobody believed me) and picking the fruit to create a dessert for tea. Taking inspiration from French toast I created my own version using the ingredients that I had spare in the summer house...it was so delicious we made it for breakfast the next day too! This is perfect as a dessert or just as a naughty treat...it's a little bit messy but that's all part of the fun.

Ingredients
  • 2 hot dog buns (this is all we had but you could use bread cakes or 4 slices of white bread with the crusts cut off)
  • 1 tbsp of sugar
  • a blob of Butter for frying
  • 2 Eggs
  • Berries (we used blueberries but you could use any soft fruit or even stewed rhubarb)
  • Optional: Icing sugar for dusting
  • Optional: Icecream or crème fraiche
First prepare your hot dog buns by cutting in half and buttering both halves of the bread. If you are using sliced bread remove the crusts and butter both sides.

Wash the berries and coat them in a generous sprinkling of sugar (depending how sweet you want them to be)

Next beat the eggs and mix in a tablespoon of sugar.

Dip each half of bread into the eggy mixture and lay on a plate or chopping board and then add your berries to one half of the bread (as though you are making a sandwich) put the other half on top and squash down.

Next, heat your butter in a frying pan and carefully add your sandwich to the pan, squashing it down with the spatula. When one side is golden brown carefully flip the sandwich over and cook the other side until golden brown and the egg is cooked through. Don't worry if some of the berries come out, they will cook in the pan and go all gooey and lovely. If you like add some extra berries to the pan and cook but don't let them burn.

When all golden and brown cook your next sandwich in the same way. Turn out on to a plate and cut in half, tip any cooked berries out of the pan on to the plate.

Don't worry about presentation...it's supposed to look messy but you can dust a little icing sugar on top and serve with a dollop of ice cream or crème fraiche if you like. At the summer house we only had yoghurt but a little bit of that worked just as well too.

Enjoy!


The Summer House

Back home in Finland, the summer house is up there with sauna when it comes to enduring national obsessions. As soon as the ice and snow of the long, harsh winter starts to fade, people all over the country head to their haven: a small (or somewhat bigger) wooden cabin somewhere in the woods, preferably by a lake (the fact that the clichéd description of Finland as the "country of thousands of lakes" is actually true helps), with sauna and no immediate neighbours as essential accessories. For Finns, it's not enough to have a roof over their heads: for many, a normal house in an urban area will not suffice at all during the brief but frequently blazing summer season. The hardiest summer house enthusiasts even make regular visits to their summer refuge during winter months: quite a feat considering everything is iced over or covered in snow, and the heating's not been on since September.

This urge to escape the busy cities and head towards a quiet plot on the edge of wilderness where you're more likely to encounter a moose than another human being probably says something about the mindset of Finns. Finland is a large country (area-wise) with very few people in it. As the country's moved away from agriculture to more modern industries, the vast majority of these people have centred on a few densely populated, ever-growing cities. Being used to lengthy silences and the closeness of nature on some primal level, being surrounded by so many other humans on a daily basis simply becomes a bit too much to handle for many. It's time to get back to the roots, the woods and the lakes, and retreating to a summer house is considerably easier than, say, actually turning into a forest-dwelling, berry-foraging, hairy hermit. 

Sounds strange? Please take my word for it: resting at the summer house for a week or so is hugely refreshing. That's even if you end up having almost as many neighbours as in the city, many of whom follow the time-honoured Finnish tradition of not putting on any swimwear as they leap to the lake from the sauna...which is very much the case with the cabin by Löyttyjärvi, near the town of Karkkila (about an hour's drive from Helsinki) we're lucky enough to have access to. It's a question of cutting out various modern distractions (although electricity supply is warmly recommended) and simplifying your life to a bunch of basic activities: sauna, chopping wood, swimming, rowing at the lake, picking berries (and dodging snakes in order to fetch them), resting - and cooking. In this area, too, simplicity rules: the kitchen at our (borrowed) summer house is miniscule and stripped-down, and there's only so many ingredients you can cram into the boot of the car. When the weather's good, the best option is to heat up the grill and cook outside whilst trying not to be distracted/disturbed by nude swimmers.


Monday 16 April 2012

From the Mrs: Joyce's Chocolate Cake

Joyce Ashton was a friend of my parents, in fact her daughter Joan was the vicar at mine and Janne's wedding. Joyce was a good cook and an excellent cake maker and I always remember loving this moist chocolate cake that she used to make. She gave us the recipe and it was only recently when I was digging around the cookbooks at my Mum's that I came across this recipe again and was reminded just how yummy this chocolate cake is.

It's not too chocolaty, which is great. The sponge is quite light but then I like to make it a little bit naughty by making a nice chocolate icing to go on top. You can make it however 
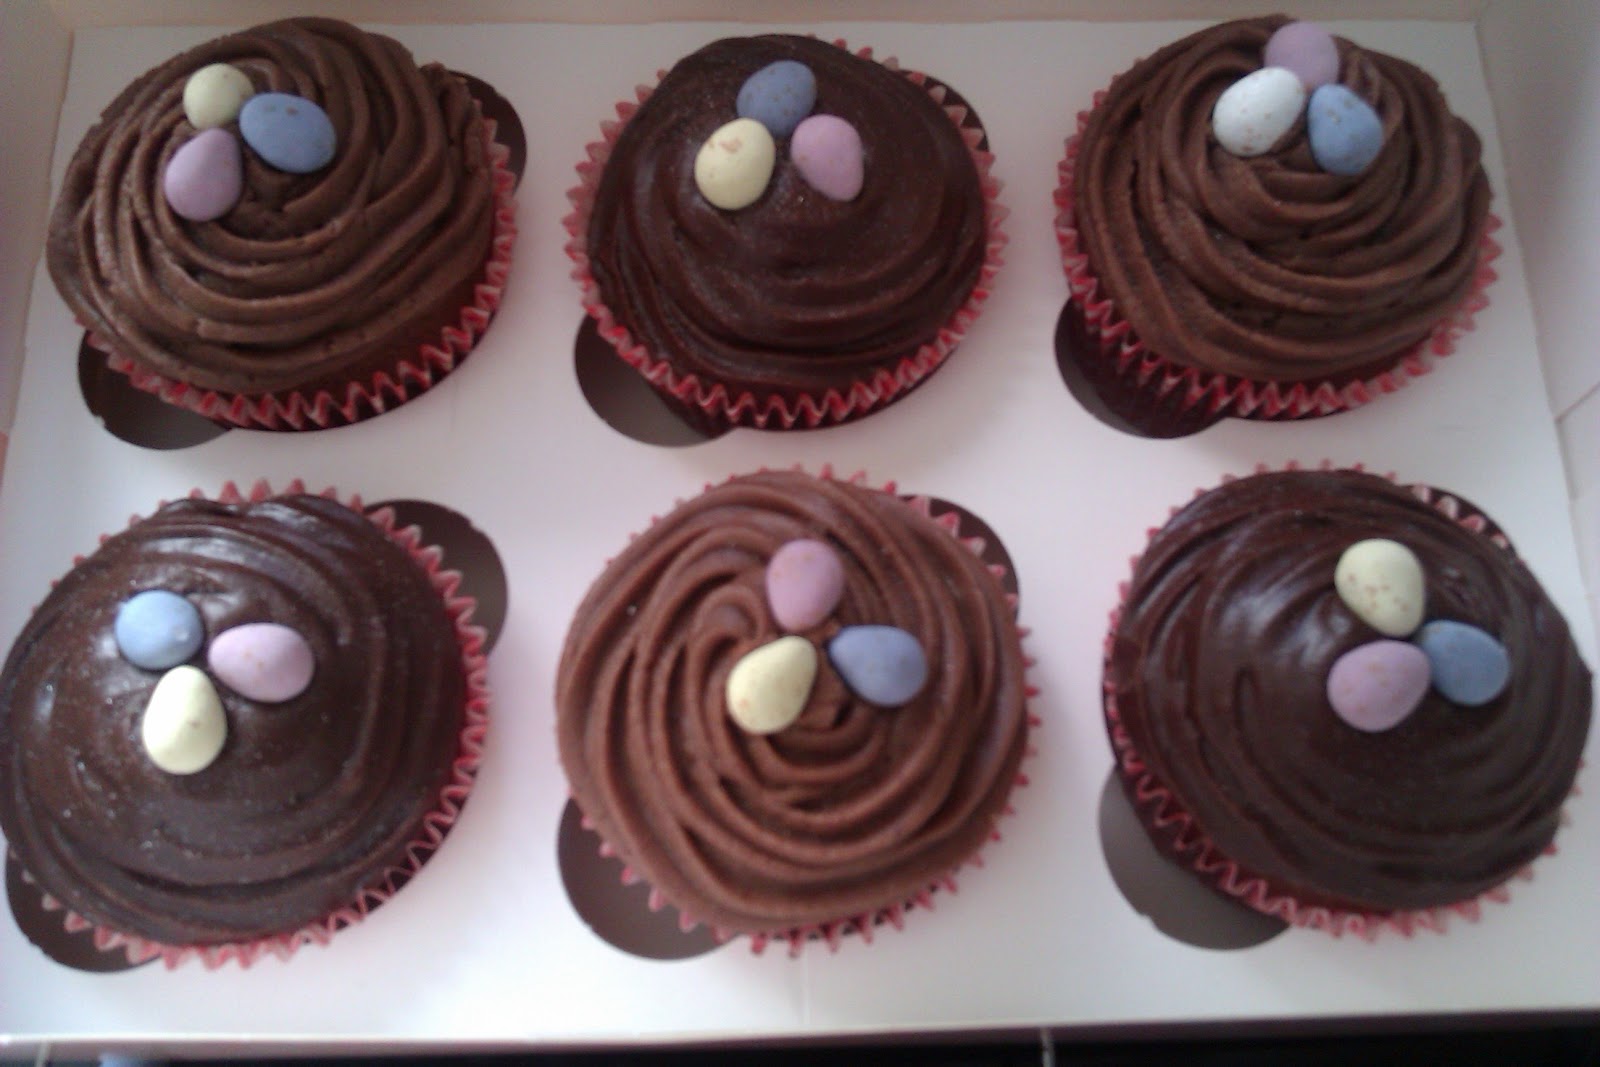
you like: as a sandwich cake, a loaf cake or as cupcakes. Here I've made it as cupcakes but if you want to do it as a sandwich cake just grease and line two sandwich tins and make enough icing to go in the middle and on the top of the cake.

For the cupcakes you will need muffin cases, muffin tin, piping bag and two nozzles one thin and one star nozzle.

Ingredients for the sponge
  • 6ozs/175g soft margarine
  • 8ozs/225g self raising flour
  • 1 1/2 level teaspoons of baking powder
  • 6ozs/175g caster sugar
  • 3 eggs
  • 3 tablespoons of milk
  • 3 1/2 tablespoons of cocoa blended with 3 1/2 tablespoons of hot water (cooled slightly) If the mixture is too stiff add a little more milk to loosen but don't make it too runny.
Preheat the oven to gas mark 4 or 180c

Put all of the ingredients apart from the eggs into a large mixing bowl. Beat the eggs and gradually add them to the mixture to make sure that it doesn't curdle. Beat together for two minutes.

Fill the muffin tray with the muffin cases and spoon mixture into each case (about two thirds full). Bake in the preheated oven for about 25 minutes or until the sponge springs back and a cocktail stick inserted into the middle comes out clean.

If you are making a sandwich cake cook a bit longer for about 35 minutes.

Cool on a wire rack before icing.

To make the icing and filling
  • 2 1/2 ozs/ 60g of butter
  • 1 1/2  tbsp of cocoa powder
  • 9oz/250g of sieved icing sugar
  • 3 tbsp of hot milk
  • 1tsp of vanilla essence
Put the hot milk on the stove to heat

In a separate pan melt the margarine blending in the cocoa powder and then carefully stir in the icing sugar, hot milk and essence.

Beat until smooth and thick.

If you are making a sandwich cake spread the mixture into the middle of the cake. If you are making cupcakes you can attach the small nozzle to your piping bag, spoon the mixture into the bag and insert the nozzle into the middle of each cake and pipe the filling into the middle.

For the icing make the mixture again as above but add an extra 2-3ozs of sieved icing sugar to the mixture and beat in until smooth and thick. You may need to chill in the fridge for a bit but keep stirring every now again. This time either spread on to the top of your sandwich cake or attach the star nozzle to your piping bag and fill with the icing. Pipe onto your cupcake in a circular motion.

Decorate your cupcakes or sandwich cake with white chocolate shavings, mini eggs or even glitter - be as creative as you wish!

These are delicious and the way to any chocolate lovers heart. My two year old nephew(and my biggest cake critic) blew off a doughnut in favour of a chocolate cupcake...and that's the biggest compliment I can receive!


Roasted vegetable pasta with parsley, basil and mint pesto

I know, I know: it's not always exactly tempting to venture on a grand culinary adventure after, say, a ten hour day at work and a gruelling commute home. Sometimes you're just too tired to cook - and those are the times that ready meals - lovingly prepared by a robot on an assembly line - are for, right? Wrong. With a bare minimum of skill, a mere 30 minutes is all it takes to cook something genuinely delicious from scratch, as this excellent (and cheap!) pasta dish proves. In all honesty, it takes me longer to battle with the microwave than it takes to whip this one up.

Ingredients:
For the pasta:

  • 1-2 peppers
  • 1 large red onion
  • 1 or 2 courgettes
  • 4 - 5 few cloves of garlic, unpeeled and gently squashed
  • Dried pasta - I prefer wholemeal but it really makes no difference

For the pesto:
  • Fresh parsley, basil and mint - I'd say basil is the key here and should as such dominate, but you might well disagree.
  • Lemon juice - a generous dash (to taste)
  • 1 clove of garlic (that has been roasted in the oven with the veg...keep reading, please!)
  • Olive or rapeseed oil - a good glug of
  • Salt
  • Black pepper

How to cook:
Turn the oven up to gas mark 4. Clean and chop your veggies and place on a roomy roasting tin with the garlic cloves and a generous glug of oil. A word of warning from bitter experience: do not peel the garlic cloves, or you'll end up with a killer dose of garlicity. Place in the oven and roast for approximately 30 minutes, or until they look softened up and ready to eat. Stir occasionally.

In the meantime, prepare your pesto. This couldn't be any easier: simply place all ingredients into a blender and press the button...job done. Pick one of the garlic cloves that have been roasting with the veg, peel and add to the blender (watch your fingers - the garlic clove will be hot). That's the pesto done...easy, eh?
Once the veggies are about halfway done, put your pasta on the boil - once it's boiling on full steam, it'll be ready in approximately 10 minutes.
Once the individual ingredients are done, you can either spoon them on a plate in separate layers (pasta - veg - sauce) or mix them all together in a large bowl.
Finish with a generous shaving of parmesan or other hard, salty Italian cheese (don't be tricked by the ready-grated versions though: sweaty doesn't begin to describe the aroma) and serve with some nice bread and, why not, a glass of white wine.

Better than that microwaveable spaghetti Bolognese you were eyeing up, isn't it?


Sunday 15 April 2012

The Beginning...

Cooking in the hole

I’m not sure what got me interested in cooking...
The early signs definitely weren’t encouraging. Although I’d been taught the basics at home (I’d make mean pancakes at a relatively young age), I’d failed to evolve. For far too long, I lived on noodles and fish fingers, spiced up by my very own (and best-forgotten) innovation, Bisto gravy with a liberal sprinkling of chili flakes. That, or processed produce from Jack Fulton’s, a culinary disaster zone comprising of frozen foods shipped in from all corners of the known universe. My early attempts at impressing my then-girlfriend (now wife) with home-cooked meals were an unmitigated disaster. My original recipe of meatballs in tomato sauce with mashed potatoes ended up as barely cooked mince floating in a lukewarm ocean of readymade pasta sauce served with lumpy, cold mash…after the better part of three hours spent worrying, sweating and battling an obviously futile battle in front of the stove.

It’s no surprise I was put off trying for a long time. We lived on processed foods, the fridge full of plastic and cardboard packages where it’d have been teeming with fresh produce. Had the oven and microwave broken we’d have starved, as the functions of food preparation beyond reheating ready meals remained a mystery. The terrible diet showed. Always prone to rapid weight gain, I got chubbier and chubbier until I started to resemble a jolly round lady (I am male) much older than my years. Looking at my flabby skin and ample meat, it was almost as if my body was depressed by the nutritionally suspect, heavily salted tat I kept shoveling down my throat.

As worrying as it was to see a fairly prominent pair of chubby cheeks as I peeked downwards, or as dismaying as it was to watch as a steadily increasing procession of chins started to make their way down towards my throat, the obvious health perils of subsisting almost exclusively on factory-manufactured imitations of food weren’t enough to make me reach for a recipe book. The breaking point was the cheesy chicken disaster. Knowing what I know now, it’s obvious that the combination of soft cheese, ample amount of dried chili and pineapple on the same pan should’ve made the alarm bells squeal at an ear-splitting pitch. But I knew nothing back then, and proceeded with the culinary abomination. The results were truly criminal. Get past the plastic texture of the rapidly congealing cheese (which wasn’t exactly easy: we’re talking chewing gum territory here), and you were faced with either the throat-shredding heat of an insanely generous dosage of lava-hot dried chili flakes or the cloying sweetness of pineapple – a brilliant fruit, as it happens, but totally the wrong guest to invite for the main meal. Even the rice was overcooked, a lumpy, texture-free porridge where you’d need the patience of a saint to detect where one gain started and the next began. It was embarrassing. I was starving. Something had to change.  
Soon afterwards, a copy of Jamie Oliver’s Jamie’s Dinners mysteriously appeared in the house. According to my girlfriend (now wife), she’d found a damaged copy in the bookshop where she worked, but the suspiciously pristine copy now makes me wonder whether it was a less than subtle strategy to keep me in the kitchen now that I’d finally ventured near the stove, only this time cooking something that could actually be eaten by humans (not that I would have subjected any animals to the cruelty of having to eat that rubbery chicken-pineapple mess). I’d seen and attempted to follow recipes before (believe it or not, I hadn’t actually made up that evil chicken dish), but Jamie’s stuff was different, unpretentious, easy to follow even for a totally clueless amateur in kitchen stakes, stripped-down but, crucially, never dull. His enthusiasm and friendly approach were contagious, even if I initially only dared to tackle two dishes, salmon with couscous and Chinese chicken with noodles (both of which was much recommended for cooking novices worrying about burning down the house), over and over and over and over again, with the results that I never want to see, smell or taste this duo ever again. But as it turns out, that’s how you learn. You pick something you’re only moderately scared of, use it to improve your confidence and competency, and move on to bigger and better things.      

A lot has changed since those early attempts to build up a healthy, tasty diet. Jamie Oliver – who deserves a massive round of applause for making cooking accessible to me and, undoubtedly, many other hapless kitchen disasters, as such introducing me to an incredibly rewarding, life-enhancing pastime that previously seemed totally out of my reach - has been joined by other food heroes. I’ve made my first roast. I’ve mastered – to an extent – Indian cooking, a definite personal favorite. I’ve finally gotten capable enough to have a go at some fairly complex stuff from my native Finland, introducing modern twists that mean these new versions don’t rely entirely on my homeland’s traditional range of spices: butter, salt and lard. I’ve even had a go at baking, something I’m still quite intimated by (all that precision, weighing and science…scary). I used to loathe vegetables (which showed in my pallid complexion and hefty gut), now they’re my favourites (especially ever-versatile cabbage and its many cousins), and we can easily go for most of the week without any meat or fish seeing the insides of our fridge. I’ve even lost a fair bit of weight, and feel indescribably better, both mentally and physically, a lot of which must be credited to the radical lifestyle change my interest in cooking has brought on.
Summer house cooking in Finland
Toad in the Hole’s not about listing accomplishments or showing off increasing skills. The point, such as it is, is to prove how easy and, crucially, fun cooking can be, even when time, money and resources are scarce, and how much a basic grasp of cooking utensils can add to everyday life. If there’s an aim to all this, it’s to prove that it’s possible to take the same 30 minutes it would take to heat a ready meal and end up with something healthier, cheaper, more nutritious and, most importantly, tastier, even if your mastery of cookery is far from exhaustive and you can’t really be bothered to battle with complicated processes and fancy fine-tunings.